This site has moved! Old posts will remain here but new posts will be at www.embergrass.com/blog. Please go there to keep up with new content and re-subscribe!

Showing posts with label Workspace. Show all posts

Thursday, 6 October 2011

Work in Progress - Metals

I thought you might be interested in seeing more of my work in progress; seeing my ideas and designs as they take shape rather than only viewing the finished product or a refined and perfected process.

So this is the first post in a new series 'Work in Progress' where I will share a snapshot of my desk and explain a little about what is going on.

Different metals ready to be textured

Today's post is titled 'Metals because I finally got around to using some of the alternative metals I've had sat in my drawer for months now. (Look out for an upcoming post if you want to find out what the metals are)

Tuesday, 20 September 2011

How to: make your own plier stand

Until recently I was using an old jam jar to keep my pliers in. I would hang one arm of the pliers inside the jar so the other hung outside the jar and they sat around in a circle on the rim of the jar. The system worked great until I took out all the pliers on one side of the jar and then the weight was unbalanced and the whole thing fell over.

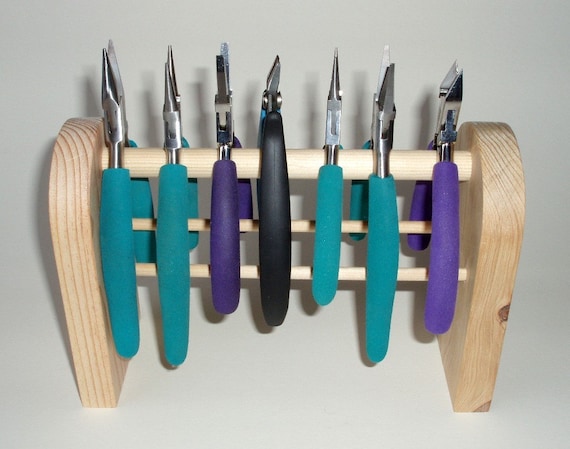
However I do keep adding to my plier collection and unfortunately, my little jar was getting too small to fit any more pliers in. I've seen loads of plier stands for sale like this on on the left but I was reluctant to spend any money when, I reasoned, I could make my own.

Wooden plier stand from Plane N Grain


There was a slight problem with making my own. The afore-mentioned living in a 1-bedroom apartment and not possessing woodworking tools. However, when I saw stands more in this style I knew how I could make my own.


Not having woodworking tools isn't a problem when you can use card. I used mountboard (I believe its called mat board or matting in the US) to make sure it was thick and sturdy enough card.


  1. Start by cutting a rectangle from the card. I made mine 10 1/2 inches by 8 inches. If you have loads of pliers you might want to make yours longer than 8 inches.
  2. Mark horizontal lines at 4 inches and 8 inches, creating 3 boxes 4x8, 4x8 and 2.5x8 inches.
  3. Score along the lines you marked
  4. Fold into a pyramid shape and tape or glue the sides together
  5. Paint or cover with colourful paper to decorate. Handmade style paper works well because it is very porous and flexible so will absorb the glue well and fold into the corners easily.
Finished Plier Stand

I didn't stop with just a plier stand. I also made matching pen pots and the notecard box I mentioned in my last post. The pen pots are just empty Pringles containers, cut to the right height and covered. The notecard box is an old iphone box which just happened to be the perfect size.

My family of matching desk organisers


Saturday, 17 September 2011

Sometimes 'old school' is just easier

My supplies listed alongside their costs
 A few months ago I spent many hours trying to work out how to set up an Access database to organise my supplies and finances exactly how I wanted them. At the same time I spent additional hours researching bookkeeping software and all the options available.


Eventually I was forced to conclude that to get bookkeeping software that would do what I wanted would mean spending more money (more than $0) than I wanted to. I also concluded that Access either didn't do what I wanted or I didn't have the knowledge to get it to do what I wanted.

I don't think that my requirements were radically different from those of any other crafter:
Effectively I wanted 3 lists - A) the supplies I purchase regularly and their costs B) the materials needed for each item to calculate total cost to make C) my purchases and sales for in and outgoing money.
Keeping track of how much it costs me
to make each item

Easy so far. However, when I listed a supply in list B (such as a clasp) I wanted list B to pull the data on price from list A so I didn't have to look it up myself each time. This is the part that I just couldn't get Access to do. In bookkeeping software its all about the Bill of Materials but unfortunately, the free versions of all the decent programs I found did not include this feature.

So what did I do? After feeling like I had wasted hours and hours of my life I decided to forget all about modern technology and go old school. I've always preferred tangible items anyway, you won't catch me getting out my phone to write a shopping list. So I bought a stack of notecards and now, when I need to price up a new item I just made or lookup how much wire to cut for my latest order, I can easily grab the relevant cards.

If you were actually reading my woes above you will probably be saying 'but you still have to manually look up the cost of each supply'. That is true but I find it so much easier and somehow more enjoyable to do that on a notecard rather than a screen.

My new notecard box with handmade dividers
Are you all about electronic gadgets or do you prefer a pen and paper, like me?

Sunday, 12 June 2011

New directions

When I first started making jewelry as an idle summer hobby, wire was simply a convenient way to connect the beads to the ear wires. Almost exactly a year ago I bought a hammer and a bench block and started to discover that wire could be so much more. That was really a major turning point in my jewelry designs as I began to explore the beauty of metal in different shapes and with different textures.

These copper strips curled up as I cut them out!
Since then I have continued to expand my tool collection and this has given me the ability to create a wider and wider variety of designs but none so significant as my latest purchase.

Given my obsession with the natural beauty of metal it was only a matter of time before I looked into sheet metal. Wire is great and you can do a lot with it, especially if you start using multiple gauges, but there are so many more possibilities with whole sheets of the stuff!

Of course I've always known it was available but my 'studio' setup is rather limited and I didn't think I would be able to get the necessary tools for it. My workbench has drawers in so it's not possible to attach a clamp to it and without that it would be almost impossible to saw out any shapes from the metal. Did I mention its also in my bedroom? I don't think metal sawdust is a good thing to have floating around your bedroom!


Then I found these from Fusion Beads! I really thought they were too good to be true. Surely they couldn't be strong enough to cut through metal - they're only scissors. Maybe they only work for someone who regularly lifts weights with their fingers.

Anyway, I decided they were probably worth trying out so I bought a pair and several sheets of copper.


But I didn't stop there. I also found a disc cutter to easily cut out circles from my sheets of copper and promptly ordered one of those too! It arrived this week and of course I punched a circle straight away...


...and then a few more circles...


...and then I punched circles out of circles!

It was really tough to cut out the discs, I had to get our actual proper DIY hammer because my jewelry one just wasn't tough enough and even then I had to hammer really hard. I moved the cutter onto the floor so the carpet would absorb most of the noise!
It was fun though and I have so many designs in my head for all these different sizes of circle.

My dapping block


I actually bought another gadget as well - a dapping block. I can use it to make my circles into little dome shapes - very cool :)

I have a few completed designs already and a few that I'm still working on. I'm very excited to post them up here and show you so look out for them in the next few days!

Friday, 18 March 2011

Studio Cat

Meet my cat, Hertz. We found him on the website for the local SPCA shelter and it was love at first sight - he was the only kitten mischievously trying to play with the camera! When we went down to check him out it turned out he was exactly what we were looking for; friendly, laid back and extremely playful. We brought him home the same day!

At the SFSPCA they have a personality chart for cats and a survey so you can find out which type would be suitable for you and your lifestyle. I decided almost immediately I was looking for a 'personal assistant':

You’re working on the computer? Let me press the keys. 
Reading the paper? I’ll hold the pages down for you. 
Watching TV? I’ll just plop in your lap so you can pet me. 
I love an orderly household, don’t you? I’ll help you with all your chores, and 
I’ll help you relax when we’re done. 
You’ll wonder how you ever managed without me.

Well we got one and the thing he most loves to help with is jewelry making. He holds the end of the wire for me, picks out the beads from my tray and slides my reels of chain and wire towards me when they're out of reach. He loves having his picture taken and he always tries to get in the shot when I photograph my jewelry. When he can't see any obvious way to help he likes to sit down right in the middle of my desk so he is ready when I need him again.


Do you have a studio pet too? Or do you prefer to work without 'help'? What do you do if you work with dangerous equipment or chemicals? I have to shut Hertz out of the room when I'm using my blowtorch because he tries to help with that too :S

Tuesday, 9 November 2010

Destash Sale!

I realise that this is completely the wrong time of year for spring cleaning but re-doing my website made me realise that my style of jewelry has changed rather significantly since I first began.

What started out as simple strings of beads hooked onto earwires slowly evolved into pieces almost exclusively made from shaped wire. I am very happy with the transition, I feel that my newer items are much more original and they stretch my imagination more. However it does mean that all the beads I purchased with which to make beaded jewelry are now redundant.

Much as it pains me to empty out my beautiful, colourful bead trays, there is no point in having beads sitting around not doing anything. So I have spent my day packaging them all up ready to sell on Etsy. Its taken a lot longer than I expected and I'm still not done, there are a few more beads to package and photos to take (fingers crossed for a sunny day tomorrow).

My workbench has been taken over with packets and packets of beads!

In the next few days I will get these listed on Etsy so if you are a beader or know someone who is, or even if you know someone who might like to start and think they would appreciate a packet or 2 for Christmas, be sure to check it out :)

Wednesday, 17 March 2010

Isn't it amazing what you can find when you tidy your desk!

Today I had a good sort out (and clean) of my workspace. Wiped up all the dust and wire scraps, threw away failed projects and tidied things into a neater and more organised arrangement.

Since I put so much effort into it, I thought I'd share my new, tidy desk with you and give you an idea of what my workspace is like (tiny!) and what stuff I have on it.

Sadly I couldn't fit it all into 1 image small enough and still have readable text, so click on the image to see it full size :)

Points to anyone who comments, pointing out items on the picture that I haven't mentioned!!