To be a successful online seller you need skills in so many more areas besides making or finding great products to sell. Photography is one those skills and one of the most important ones too! If you are lucky you may have a friend who is a great photographer and willing to take your pictures for you or if you make a lot of money you can pay a professional to do it for you. For the rest of us we need to do the best we can.
Camera
I'm not going to lie, you need a decent camera. Not a top-of-the-range SLR but - for jewelry and other small things at least - one that has a macro mode. Don't worry about megapixels, even the cheapest camera phone these days has more than enough megapixels for online photos.
The quality of the image is important, some cameras can make it look like its foggy or there was a sandstorm. However this is another one you shouldn't need to worry about - most cameras with a macro mode will be decent quality.
Why do I need a macro mode? Macro mode allows you to take real closeups of your jewelry and still stay in focus. If you try to take closeups without it you will find it focuses on the background instead of the jewelry and then your beautiful jewelry will look blurred. Macro mode also de-focuses the background so it doesn't distract the viewer from the intended focus - the jewelry.
Light
Lighting is extremely important too. Trying to take pictures in artificial light leads to a yellow tinge to the item and the picture in general. Taking photos under a spotlight can work but tends to lead to areas which are very bright next to areas which are dark and dramatic and distracting shadows.
Whilst natural light is best, bright sunshine isn't always the best choice either as it can lead to pictures being overexposed and, again, very dramatic shadows. You can tone down direct sunlight by placing a thin white cloth in between the sun and the item to be photographed but the easiest thing to do is to find a well-lit spot that is out of the direct beam of the sun.
Background
The background you use for your pictures can have a huge impact on the way the viewer sees your items. Some aspects of choosing a background are common sense and its mostly just a case of trying different things until you find one that works with your pieces and fits with your style too.

Natural backgrounds like wood or rocks tend to work very well but you still need to be careful with the colours. I would not use a wood background for a picture of copper jewelry, for example.

A patterned background can look beautiful and add a certain style to all your pictures. Book pages are very popular or floral paper. However you should make sure that the pattern is not too bold and doesn't detract from your jewelry in any way.

A bright or contrasting background can make a bold statement and attract attention to your pieces. Just be careful it doesn't clash or alter the colour perceptions of your item. This pink background makes the turquoise beads look a different shade and presenting colours accurately online is difficult enough without complications like this!
Be very careful with a black background as it can suck the light out of your picture (left). If you use very bright light to compensate you end up with an overexposed picture instead (right).
If your black surface is reflective it can work but then you end up with a whole host of other issues!
Some items, especially earrings may work better if they are hung up rather than laid flat. Many people use a glass to hang them from with their background behind (make sure the glass is spotless!) but I find it can work well to stuff tissue paper into the glass and then hang the earrings so the direct background is the paper.
Items such as necklaces, on the other hand, may look good draped over an uneven surface such as a rock, or simply laid out in an interesting manner.
Background for crystals:
Whilst I have been happy with the quality of my pictures recently, until the other day I was still struggling to take good pictures of crystal-coloured swarovski crystals. The completely transparent nature of these beads means taking a picture of them is like trying to take a picture of a window.
 I tried using a darkish background with some success but still wasn't completely happy with the focus on the beads.
Inspiration came when I was reading this blog by Angela Smith. I noticed that her photos of swarovski crystals are taken without a close background. Instead she has positioned the piece so there is nothing near to it and used the landscape behind as the background... and it works beautifully!

Of course I gave it a go, using my wall as the background and I am really pleased with the result. The focus is so much better and the space behind the piece allows more light to pass through it, accenting the facets.
Now I need to investigate with different backgrounds because I think this now looks far too grey and boring. Angela's look much nicer with the leafy green behind so I need to find somewhere nearby that I can use for the same effect! Oh and also set up a frame to hang them from.
Editing
My final section is about editing your pictures. Hopefully if you put in the effort to get the shot right to begin with, your photos will not need much editing. However there is one aspect that you will almost certainly still need to change - cropping. You don't need to pay for photoshop, there are loads of programs which will allow you to crop (and usually other simple things like changing the lighting). These days you probably even have one free with your computer. If not try the Gimp, its completely free and offers many of the same features of photoshop.
Be sure to crop your picture to remove as much of the background as possible - you want people to focus on the item you're selling.


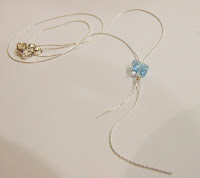
Don't be afraid to crop out parts of the item itself, especially if its large, to focus in on areas of detail or just a sample of the whole thing. The picture to the right features the entire necklace but doesn't stand out in anyway. From a distance you could be forgiven for thinking it was just an off-white square.
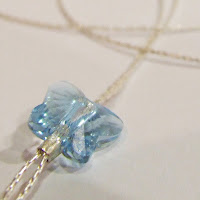
This picture is much more eye-catching. If you use a site like Etsy you can set the close-up, eye-grabbing picture as the main one for the item and then use the one that shows the full item as an extra for people who are interested and now want to gain an overall idea of the item.
It has taken me a while to refine my photo technique and I'm still working on it, so hopefully this will help to speed up the process for someone! If you have any great tips for taking photos of jewelry please add them to the comments below :)


Fabulous tips! I learned something new with the lovely crystals, and actually earrings in general. Thank you so much for sharing!
ReplyDelete