This site has moved! Old posts will remain here but new posts will be at www.embergrass.com/blog. Please go there to keep up with new content and re-subscribe!

Monday, 27 February 2012

Inspiration - Thistle

There is a reason why I haven't posted for 2 weeks: I've been rethinking the posts I write, considering some new ideas and trying to decide which of my posts you actually like to read.

On that note I am changing the format of my inspiration post and I may play with a few ideas before I settle on one. Here is the first of the new style, let me know what you think!

Thistled Tones from Design Seeds

I love the Design Seeds so I'll definitely be keeping them! This week this gorgeous photo caught my eye and those are some of my favourite colours, beautiful for spring.

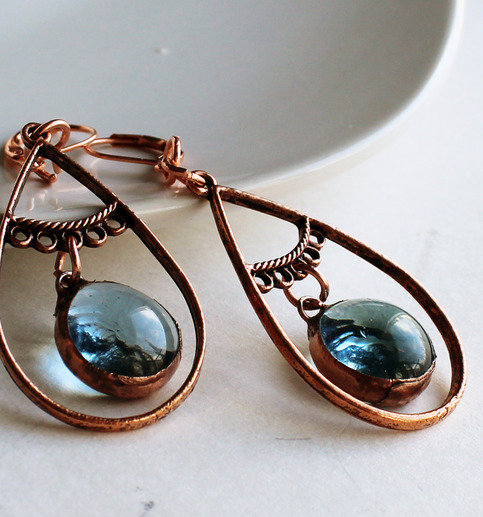
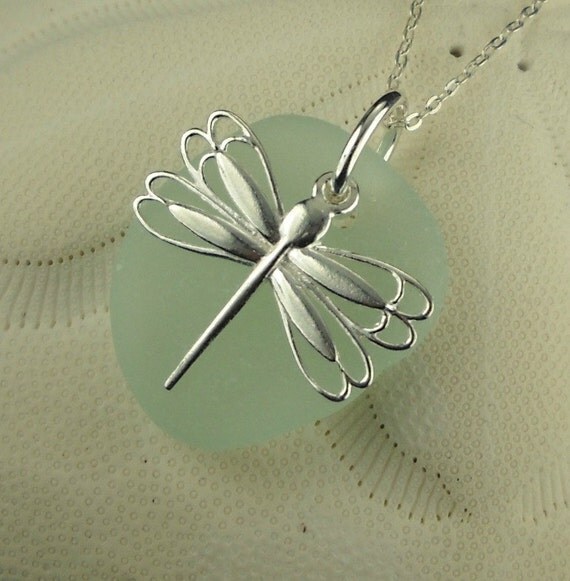
Given that this blog is about jewelry I want to shift the focus back that way so I'm leaving out the Etsy treasury and featuring jewelry pieces from all over the web.

Earrings from L.A. Glass Studio


Ring from Anne Sportun


Pendant from Aldari Jewelry Designs

Pendant from Surfside Sea Glass
Please let me know if you have any suggestions for these posts. I'm open to ideas for different ways to do the inspiration posts (or if you think I should scrap them altogether) as well as suggestions of posts you'd like to see in the future. All (related) comments welcome!

Monday, 6 February 2012

Inspiration - Sugar

I love sugar, a little too much to be honest! I will happily eat sugar cubes straight out the bowl until someone takes it away from me.

Sugared Brights from Design Seeds
I also love how pretty sugar can look - almost sparkly especially on top of bright colours.

Sugar Treasury on Etsy

Thursday, 2 February 2012

How to: Add Pinterest button to Storenvy products

Just a quick post as I've been working hard on updating my website and trying to collect my site, my store and my blog all in one place and giving them a cohesive look. I'm very happy with the way it's going but I'm not done yet so I need to get back to it.

However, I discovered this little trick while I was working on the html behind my Storenvy store and I thought you might want to know.

Pinterest allows you to add a button to your website to encourage people to pin what they find there. Obviously if you are an online seller its a great idea to have a button next to all your products and you can do that through this Pinterest page (scroll down to the ' "Pin It" Button for Websites' section)

However, you will quickly notice that if you use that page you are required to type the URL of the product page and the product image - this means you would have to make a button for each and every one of your products. Not only would that be time consuming, you don't actually have access to the html for individual product pages on Storenvy.

But you can still add a Pinterest button and the good news is that you only need to make the button once!

You need to edit the html directly of your "Product" page.

Find the section that looks like this:


Then copy and paste this section of code directly after it:


It should end up looking like this:


Tuesday, 31 January 2012

New project - Rock

You know those Wedgewood beads I mentioned the other day? Well they aren't actually the first unique supplies I've been given.


I got these cute little chunks of rock from my friend Abby after I looked after her cat while they were away.

She brought them back for me from Seattle and said she thought I might be able to make something with them - how exciting! They have a very faint tinge of pink to them and I assume they're some kind of quartz.
 They came simply wrapped in that gold-coloured wire but I decided it just wasn't going to be enough of a challenge if I kept them like that.

So I took off the wire and cleaned out the dirt from all the cracks and crevices...

... and then they sat on my desk for months while I waited for inspiration to hit. I started making something with them occasionally but each time would end up dismantling the project.

Of course, eventually, inspiration did hit. I started with the smaller piece and took advantage of its rough surface to create a wiggly wrap around the top and a loop so I could suspend it. I had a long piece of brass chain waiting for a home so I added 2 tiny rose quartz nuggets and turned it into a really long pendant.

I tried to make a ring with the larger piece but it was just too big, it looked ridiculous and kept trying to turn around on my finger. Eventually I took a risk and decided to attempt to make the piece smaller. I put the rock on my steel bench block and whacked it with a hammer whilst praying I wouldn't end up with rubble all over the room!


It worked, though, I ended up with about 3 smaller pieces (and lots of crumbs). I took the largest piece and tried again to make a ring - much better. It's still quite a large ring, so for parties only but not on the ridiculous scale of the first version!

 I still haven't done anything with the final 2 pieces, I'll have to wait for more inspiration before I work on those. I'll let you know when I do :)

Monday, 30 January 2012

Inspiration - Rocks

I usually have an idea for a theme for the inspiration post before I start looking for items and colours online but today I decided I would start by heading over to Design Seeds and seeing what jumped out at me.

Agate Tones from Design Seeds

As it turned out, this was the top post and it definitely jumped out at me! Those are some of my favourite colours and I love the beautiful, dramatic patterns in the rock. Theme chosen!

Rocks Treasury on Etsy

My biggest challenge when putting together this treasury was to make sure it wasn't all gemstone jewelry! It was also the first treasury in a while where I've had to try out different search terms to get appropriate results. I even had to add some items which just fit for the colour.

Anyway, I hope you like it and I hope it inspires you this week. :)

Thursday, 26 January 2012

Featured Artist - Michele Grady Designs

The featured artist posts are back! I love sharing awesome jewelry artists with you and I've found a few more great ones :) I've also started a Pinterest board with pictures from all the jewelry artists who have ever been featured on this blog.

This week the artist is Michele Grady Designs. She works in Sterling Silver mostly but also with Copper and gemstones. Her style is very bold, chunky and industrial, featuring lots of texture and patina. Here are a few of my favourite pieces:

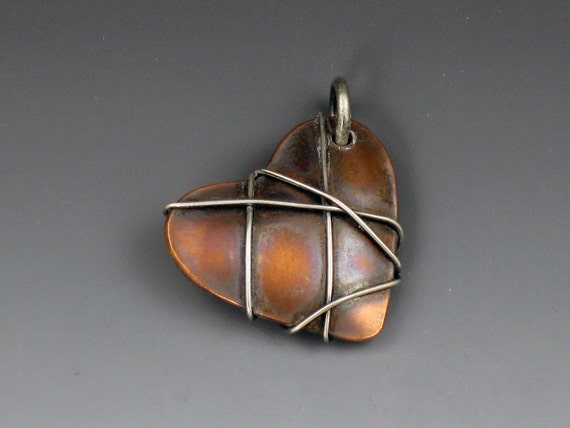
Constricted Heart Charm
This one is perfect for the rapidly-approaching Valentines day! I love the colours and the way the patina highlights the wire.

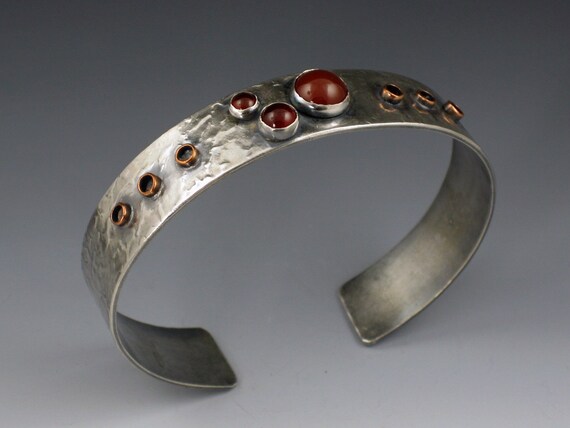
Wrinkled Skin Cuff


Grapevine Cuff

Here are 2 very different Sterling cuffs yet obviously both the same style. The first is accented with Carnelian and Copper, the second with Amber.

Which Michele Grady piece is your favourite?

Wednesday, 25 January 2012

How to: Make Craft Fair Table Risers


I've been promising you this post for a while now so I figured it was probably time I got on with it!

I made these table risers a few months ago when I designed the setup for my table. I knew I needed to provide some elevation for my table but I wanted to do that as cheaply as possible in a way that also looked good.

I'm not really a fan of draping a tablecloth over upturned boxes so I looked around for alternatives. Eventually I came up with these upright display pads but I still needed a way to raise them above the stuff in front of them. I also wanted to be able to use the table space behind/under the risers for my tools and supplies.

The idea was really simple, I bought some long planks of pine from Lowe's (about 4 inches wide) and had them cut them into 2 foot sections for me. I also picked up a 2 inch wide piece and chopped it into 4 inch lengths.


  • To make each riser you take 2 planks 4 inches by 2 feet and 2 pieces 2 inches by 4 inches. You also need some nails, wood glue and a heavy duty hammer. 
  • Glue the 2 large planks together along their longest sides and add a few nails to pin them together while the glue dries. 
  • You will now have 2 sides of a box, one will be 4 inches high and the other will be a little higher thanks to the addition of the other plank. Make the higher side the front and the 4 inch side the top then attach the other 2 pieces of wood to provide supports at the back.


At this stage you can stain, paint or otherwise finish the risers however you choose. I used a dark walnut wood stain which picked out the grain in the pine nicely and enhanced the rustic look.

My risers are more than just mini shelves, though. They are also the means by which my upright display boards remain upright and there are a few more steps to follow if you want yours to do the same.

  • You will need a drill, nuts, bolts and some kind of corner bracket hardware with screws and holes in both sides. Bear in mind that you will be screwing into the back of your display pads so make sure your screws are short enough not to go all the way through to the other side, while still being large enough to not fit all the way through the holes in the bracket. Your bolts must also be able to fit through the holes but not all the way.
  • Screw the bracket into the middle of display pad so it aligns with the bottom. You don't need to be very precise as the padding will even out any errors, I did mine by eye.
  • Stand the pad on the riser where you will want it to be when you're all done and use a pen to mark where the holes are on the bottom half of your bracket.
  • Drill holes where you marked, using a drill bit slightly larger than your bolts.
  • That's it, you can assemble it by standing the pad on the riser and aligning the holes. Put a bolt through each hole from the top and then screw it tight with a nut from underneath.


Please note that this setup is by no means professional quality and I have no qualifications and only limited experience in woodworking/construction. I am happy with the support this setup provides to my boards but I wouldn't call it sturdy. I think it would be OK in windy conditions but could easily be pushed over by hand. I wouldn't use it for any fragile items. If you have any questions feel free to post them below and I'll do my best to answer them.